How To Set Up vsftpd for a User’s Directory on Ubuntu 20.04
184 views0November 28, 2022Updated on February 1, 2023host_know_user
Introduction
The network protocol known as FTP, or File Transfer Protocol, was previously used for transferring files between a client and server. Legacy programmes and workflows with highly specialised requirements are still supported by FTP. Consider contemporary protocols that are more effective, secure, and practical for transmitting files if you have a choice. For instance, users on the command line who use secure protocols like the scp and Internet users who download directly from their web browser via https
For many Unix-like systems, including Linux, vsftpd, or very secure FTP daemon, serves as the FTP server. It is frequently the default FTP server for many Linux distributions. Optimizing security, performance, and stability is made easier with vsftpd. Additionally, it offers robust defence against security flaws present in other FTP servers. Virtual IPD configurations, encryption support with SSL integration, and other features are all supported by vsftpd.
In this tutorial, you’ll learn how to set up vsftpd so that a user may use FTP to upload files to their home directory while securing their login information with SSL/TLS. To verify the TLS encryption, you’ll also connect to your server using the free FTP software FileZilla.
Prerequisites
You’ll need the following to follow along with this tutorial:
An Ubuntu 20.04 server, a non-root user with sudo privileges, and an active firewall are the first things you need.
The second thing you require is a local installation and configuration of FileZilla, an open-source FTP client. You can use this to check if the client can successfully connect to your server using TLS.
Step 1 — Installing vsftpd
Update your package list first:
# sudo apt update
Install the vsftpd daemon next.
# sudo apt install vsftpd
Make a copy of the configuration file after installation is finished so you can start with a clean setup and keep the original as a backup:
# sudo cp /etc/vsftpd.conf /etc/vsftpd.conf.orig
You are prepared to setup the firewall now that you have a backup of the configuration.
Step 2 — Opening the Firewall
First, make sure the firewall is enabled by checking its status. If so, you should make the necessary changes to allow FTP traffic so that firewall rules don’t prevent the tests from running.
Verify the firewall’s condition:
# sudo ufw status
The firewall is active, and only SSH is permitted through, according to this output:
output Status: active
To Action From — —— —- OpenSSH ALLOW Anywhere OpenSSH (v6) ALLOW Anywhere (v6)
You might not have any firewall rules at all or you might have additional rules. You must add rules for FTP traffic because only SSH traffic is allowed.
Open ports 20, 21, and 990 first so that they are prepared when you enable TLS:
# sudo ufw allow 20,21,990/tcp
Then, for the range of passive ports you will be configuring in the configuration file, open ports 40000–500000:
# sudo ufw allow 40000:50000/tcp
Check your firewall’s condition:
# sudo ufw status
Your firewall rules should now produce the following output:
It’s time to create a dedicated FTP user now that vsftpd has been installed and the required ports have been opened.
Step 3 — Preparing the User Directory
You will create a specific FTP user in this stage. You might already have a user who requires FTP access, though. In spite of the fact that this article explains how to maintain a current user’s access to their data, we still advise starting with a fresh dedicated FTP user until you’ve set up and tested your system before changing any existing users.
Create a test user first:
# sudo adduser hostzop
Whenever prompted, choose a password. The following prompts are optional, and you are welcome to hit ENTER to skip them since they are not necessary for this stage.
When users are limited to a certain directory, FTP is typically more secure. Chroot prisons help vsftpd achieve this. Local users are by default limited to their home directory when chroot is enabled for them. Since the directory is specifically secured by vsftpd, a user cannot write to it. This is acceptable for a new user who should only connect via FTP, but if the existing user also has shell access, they might need to write to their home folder.
Instead of taking away write access from the home directory in this example, make an ftp directory to operate as the chroot and a directory for writable files to house the real files.
# echo "vsftpd test file" | sudo tee /home/hostzop/ftp/files/test.txt
Output vsftpd test file
You will now modify our configuration after securing the ftp directory and giving the user access to the files directory.
Step 4: Configuring FTP Access
You will enable a single user with a local shell account to connect to FTP in this stage. In vsftpd.conf, the two crucial values for this are already configured. Use your preferred text editor to open this file. We’ll use nano in this case:
# sudo nano /etc/vsftpd.conf
Once the file has been opened, make sure the anonymous_enable and local_enable directives are both set to NO and YES, respectively:
/etc/vsftpd.conf
. . . # Allow anonymous FTP? (Disabled by default). anonymous_enable=NO # # Uncomment this to allow local users to log in. local_enable=YES . . .
Local logins are permitted and anonymous logins are prohibited by these settings.Remember that enabling local logins grants access to any normal user listed in the /etc/passwd file.
Users can add, modify, or delete files and directories on the filesystem using some FTP commands.Uncomment the write_enable setting to enable these commands.This can be accomplished by omitting the pound sign (#) that comes before this directive:
/etc/vsftpd.conf
. . . write_enable=YES . . .
To prevent the FTP-connected user from executing commands or accessing files outside the directory tree, uncomment the chroot:
/etc/vsftpd.conf
. . . chroot_local_user=YES . . .
The $USER environment variable should then be the value of the user_sub_token directive. After that, include a local_root directive and set it to the path shown, which also contains the $USER environment variable. This configuration makes sure that when a user logs in, they and any subsequent users will be directed to the correct user’s home directory. Include the following settings anywhere in the file:
/etc/vsftpd.conf
user_sub_token=$USER local_root=/home/$USER/ftp
To guarantee there are enough connections available, restrict the range of ports that can be used for passive FTP:
/etc/vsftpd.conf
. . . pasv_min_port=40000 pasv_max_port=50000
Note: The ports set here for the passive port range were opened in Step 2. Please make sure to update your firewall settings if you change these values.
Set the setup so that users only have access when they are specifically added to a list, rather than by default, to allow FTP access on a case-by-case basis:
Userlist_deny toggles the logic so that only those on the list are permitted access to FTP when set to YES, and everyone else is prohibited access when set to NO.
Save the file after finishing your edits, then close the editor. You can edit the file if you used nano to edit it by hitting CTRL + X, Y, then ENTER.
In the end, add your user to the /etc/vsftpd.userlist file. To append to the file, use the -a flag:
# echo "hostzop" | sudo tee -a /etc/vsftpd.userlist
Verify that it was added as expected by checking:
# cat /etc/vsftpd.userlist
Output Hostzop
To load the configuration changes, restart the daemon:
# sudo systemctl restart vsftpd
After setting up the setup, you can now test FTP access.
Step 5 — Testing FTP Access
The server is set up to only enable the user hostzop to join through FTP. We will now verify that this functions as anticipated.
You can test it by attempting to connect anonymously given that you have prohibited anonymous access. If the settings is set up correctly, authorization should be refused to anonymous users. Run the following command in another terminal window once it is open. Make sure to change 103.0.114.1 with the public IP address of your server:
# ftp -p 103.0.114.1
Try logging in as a fake user, such anonymous, when asked for a username; you’ll get the output seen below:
Output : Connected to 103.0.114.1. 220 (vsFTPd 3.0.3) Name (103.0.114.1:default): anonymous 530 Permission denied. ftp: Login failed. ftp>
Disconnecting the connection
ftp> bye
hostzop shouldn’t be the only user who is unable to connect. Connect using your sudo user if you can. Before they are permitted to enter their password, they should also be refused access:
# ftp -p 103.0.114.1
Output Connected to 103.0.114.1. 220 (vsFTPd 3.0.3) Name (103.0.114.1:default): sudo_user 530 Permission denied. ftp: Login failed. ftp>
Disconnecting the connection
ftp> bye
On the other side, the user hostzop ought to have access to connect, read, and write files. Ensure that the FTP user you have chosen may connect:
# ftp -p 103.0.114.1
Output Connected to 103.0.114.1. 220 (vsFTPd 3.0.3) Name (103.0.114.1:default): hostzop 331 Please specify the password. Password: your_user’s_password 230 Login successful. Remote system type is UNIX. Using binary mode to transfer files. ftp>
Enter the files directory now:
ftp> cd files
Output 250 Directory successfully changed.
Run get after that to download the test file you earlier prepared to your local machine:
ftp> get test.txt
Output 227 Entering Passive Mode (203,0,113,0,169,12). 150 Opening BINARY mode data connection for test.txt (17 bytes). 226 Transfer complete. 17 bytes received in 0.00 secs (4.5496 kB/s) ftp>
In order to check the write permissions, upload the file with a new name:
ftp> put test.txt upload.txt
Output 227 Entering Passive Mode (203,0,113,0,164,71). 150 Ok to send data. 226 Transfer complete. 17 bytes sent in 0.00 secs (5.3227 kB/s)
Removing the connection:
ftp> bye
You will now take action to further safeguard your server after testing your configuration.
Step 6 — Securing Transactions
You can activate TLS/SSL to offer the encryption that FTP lacks, which applies to user credentials as well as any data in transit. To use with vsftpd, the SSL certificates must first be made.
To make a fresh certificate valid for a year, use openssl and the -days flag. Include a private 2048-bit RSA key in the same command. The private key and the certificate will be found in the same file if the -keyout and -out flags are set to the same value:
For your certificate, you will be asked for your address. Fill in your own details where the highlighted values are located:
Output Generating a 2048 bit RSA private key ………………………………………………………………….+++ ………..+++ writing new private key to ‘/etc/ssl/private/vsftpd.pem’ —– You are about to be asked to enter information that will be incorporated into your certificate request. What you are about to enter is what is called a Distinguished Name or a DN. There are quite a few fields but you can leave some blank For some fields there will be a default value, If you enter ‘.’, the field will be left blank. —– Country Name (2 letter code) [AU]:US State or Province Name (full name) [Some-State]:NY Locality Name (eg, city) []:New York City Organization Name (eg, company) [Internet Widgits Pty Ltd]:hostzop Organizational Unit Name (eg, section) []: Common Name (e.g. server FQDN or YOUR name) []: your_server_ip Email Address []:
When the certificates are ready, reopen the vsftpd configuration file:
# sudo nano /etc/vsftpd.conf
There will be two lines that start with rsa_. near the file’s bottom. Put a pound sign (#) in front of each line to make them commentable.
The use of SSL will now be required, which will stop clients who cannot handle TLS from connecting. Despite the possibility that your FTP user will have to switch clients, this is required to verify that all traffic is encrypted. Make ssl_enable a YES value:
/etc/vsftpd.conf
. . . ssl_enable=YES . . .
Then, include the lines below to specifically forbid anonymous connections via SSL and demand SSL for both data transfer and logins:
Add two more options as a last step. Since the first can break many FTP clients, it won’t call for SSL reuse. The second calls for “high” encryption cypher suites, which at the moment entail key lengths of at least 128 bits:
After all of these modifications have been done, the file should look like this:
/etc/vsftpd.conf
# This option specifies the location of the RSA certificate to use for SSL # encrypted connections. #rsa_cert_file=/etc/ssl/certs/ssl-cert-snakeoil.pem #rsa_private_key_file=/etc/ssl/private/ssl-cert-snakeoil.key rsa_cert_file=/etc/ssl/private/vsftpd.pem rsa_private_key_file=/etc/ssl/private/vsftpd.pem ssl_enable=YES allow_anon_ssl=NO force_local_data_ssl=YES force_local_logins_ssl=YES ssl_tlsv1=YES ssl_sslv2=NO ssl_sslv3=NO require_ssl_reuse=NO ssl_ciphers=HIGH
Save your work and then exit the file. You can leave nano by hitting CTRL + X, Y, and ENTER.
For the modifications to take effect, restart the server:
# sudo systemctl restart vsftpd
You won’t be able to connect with an unsafe command-line client after this point. You would see the following notice if you tried:
Output ftp -p 103.0.114.1 Connected to 103.0.114.1. 220 (vsFTPd 3.0.3) Name (103.0.114.1:default): hostzop 530 Non-anonymous sessions must use encryption. ftp: Login failed. 421 Service not available, remote server has closed connection ftp>
Next, make sure you can connect using a TLS-compatible client like FileZilla.
Step 7: Use FileZilla to test TLS
The majority of current FTP clients can be set up to use TLS encryption. Due to FileZilla’s cross-platform compatibility, we will demonstrate how to connect with it for our objectives. Check the documentation for additional customers.
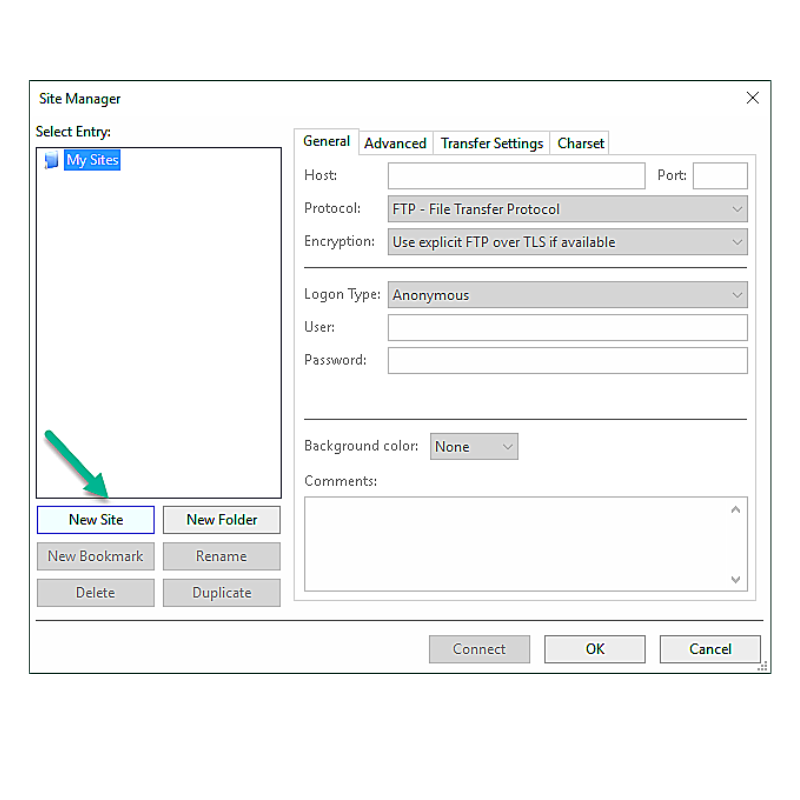
Find the Site Manager icon in FileZilla’s top row, above the word Host, when you first launch it. Press this button to:
It will launch a new window. The New Site button is located in the bottom right corner.
A new icon with the words “New Site” will appear under My Sites. Name it right away, or utilise the Rename button afterwards.
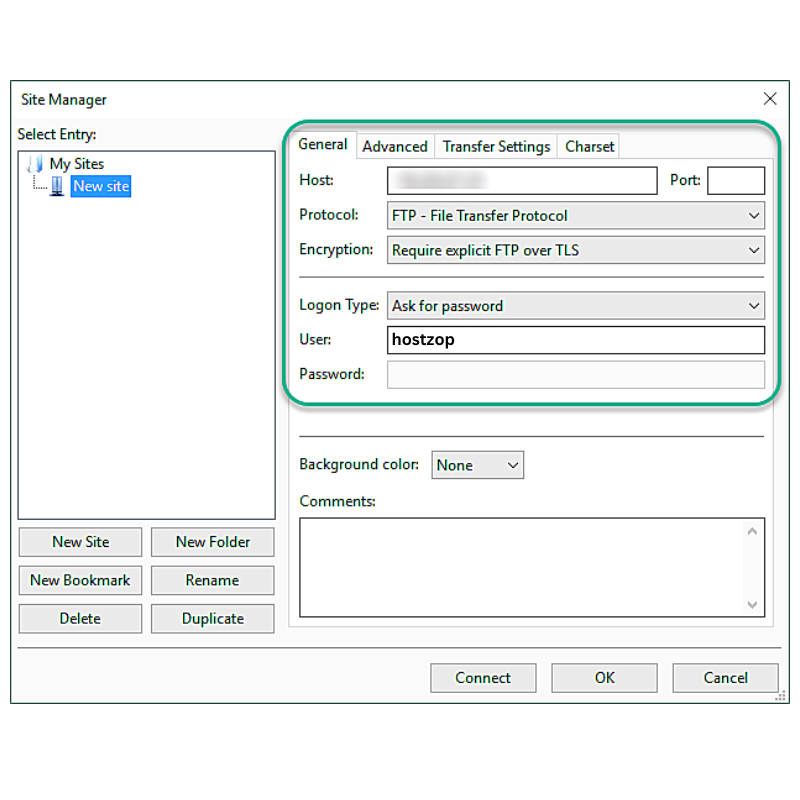
Put the name or IP address in the Host area. Pick Require explicit FTP over TLS from the drop-down menu under the encryption option.
Choose Ask for password under Logon Type. Fill out the User form with your FTP username:
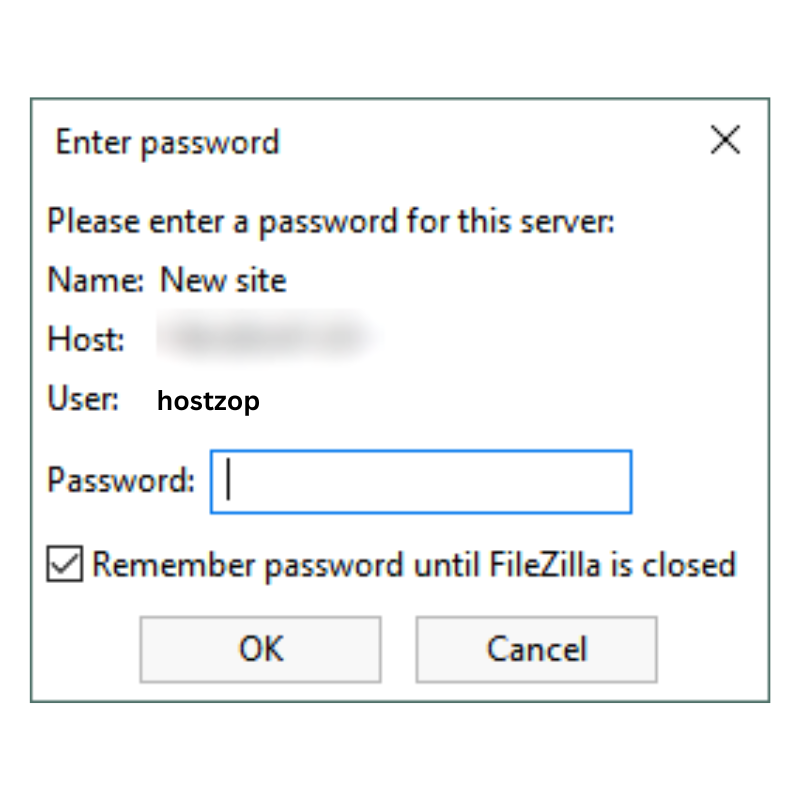
On the interface’s bottom, click the Connect button. The password for the user will be requested of you:
To connect, choose OK. You ought to now have a secure TLS/SSL connection to your server.
Next, a server certificate with the following details will be displayed to you:
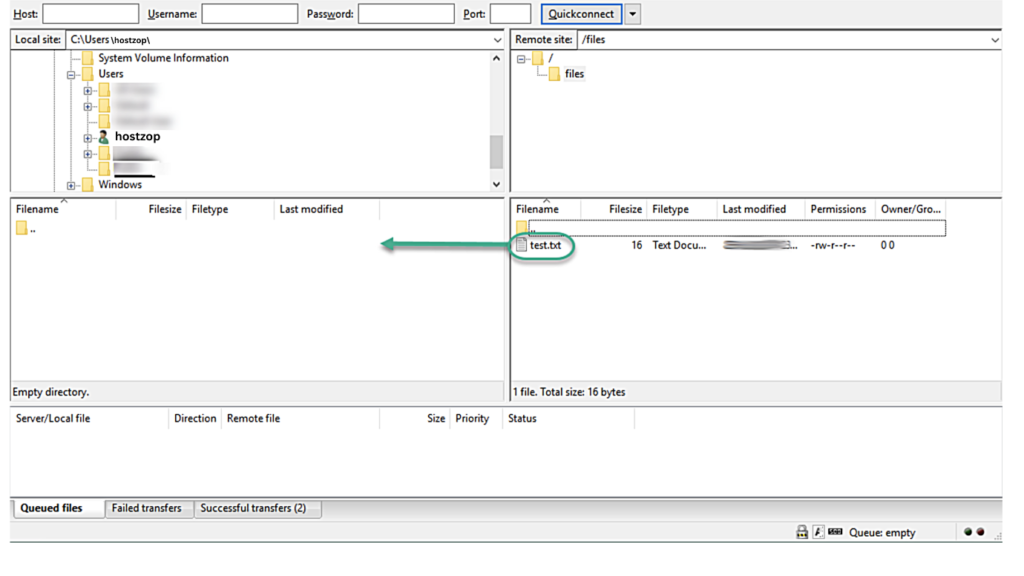
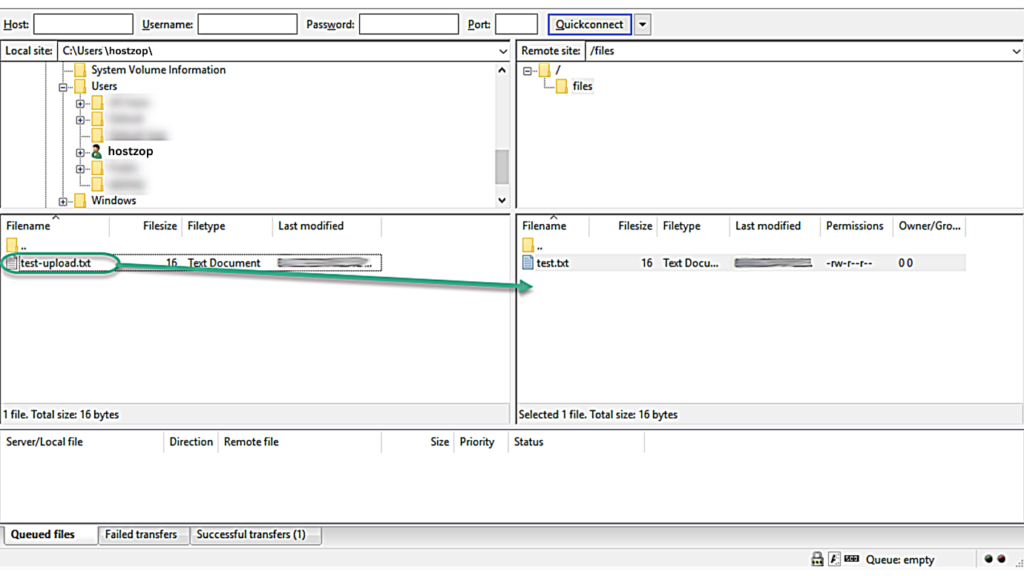
To verify that you can download files after accepting the certificate, double-click the files folder and drag upload.txt to the left:
Once you’ve done that, verify that you can upload files by right-clicking on the local copy, renaming it upload-tls.txt, and dragging it back to the server:
Now that SSL/TLS is enabled, you can successfully and securely transfer files.
Conclusion
We covered how to set up FTP for users with local accounts in this lesson. Consider looking into vsftpd’s support for virtual users if you need to use an external authentication source.