The most used web server globally is Apache HTTP Server. Numerous potent features are offered by it, such as dynamically loadable modules, strong media support, and wide integration with other well-liked programmes.
You will discover how to set up an Apache web server on your Ubuntu 18.04 server in this manual. This tutorial also provides details on significant Apache directories and files.
You should have a regular, non-root user with sudo capabilities set up on your server before starting this guide. You must also activate a fundamental firewall in order to block ports that are not required.
Create an account, then log in as your non-root user to get started.
Apache can be installed using customary package management tools because it is part of Ubuntu’s usual software repositories.
Let’s start by incorporating the most recent upstream updates into the local package index:
After that, set up the apache2 package:
Apt will install Apache and all necessary dependencies once the installation has been approved.
It is important to change the firewall settings to permit external access to the default web ports before testing Apache. You ought to have a UFW firewall set up to impose access restrictions on your server if you followed the requirements in the prerequisites.
In order to provide a few application profiles that can be used to permit or prohibit access to Apache through the firewall, Apache registers with UFW after installation.
Run the following command to list the ufw application profiles:
A list of the application profiles will be returned as a result:
Output :
Available applications:
Apache
Apache Full
Apache Secure
OpenSSH
There are three profiles for Apache, according to this list:
- Apache: This profile opens only port 80(normal, unencrypted web traffic)
- Apache Full: This profile opens both port 80(normal, unencrypted web traffic) and port 443 (TLS/SSL encrypted traffic)
- Apache Secure: This profile opens only port 443(TLS/SSL encrypted traffic)
It is advised that you activate the most stringent profile that still permits the configured traffic. In this guide, you haven’t yet set up SSL on your server, so all that’s left to do is accept traffic on port 80:
Check the status to confirm this modification:
Now, the result will show the permitted HTTP traffic:
Output:
Status: active
To Action From
— —— —-
OpenSSH ALLOW Anywhere
Apache ALLOW Anywhere
OpenSSH (v6) ALLOW Anywhere (v6)
Apache (v6) ALLOW Anywhere (v6)
Now that the Apache profile has been enabled, anyone can visit the web server.
Ubuntu 18.04 launches Apache after the installation procedure is complete. The web server ought to be operational by now.
To ensure that the service is operating, check the systemd init system:
Output :
● apache2.service – The Apache HTTP Server
Loaded: loaded (/lib/systemd/system/apache2.service; enabled; vendor preset:
Drop-In: /lib/systemd/system/apache2.service.d
└─apache2-systemd.conf
Active: active (running) since Tue 2021-09-28 16:52:56 UTC; 1min 14s ago
Main PID: 9409 (apache2)
Tasks: 55 (limit: 4915)
CGroup: /system.slice/apache2.service
├─9409 /usr/sbin/apache2 -k start
├─9410 /usr/sbin/apache2 -k start
└─9411 /usr/sbin/apache2 -k start
The service has started successfully, as seen by this output. However, requesting a page from Apache is the most effective approach to confirm this.
Through your IP address, you can browse the default Apache landing page to make sure the programme is functioning properly. There are several ways to obtain your server’s IP address from the command line if you are unsure of it.
the following commands at the command prompt on your server:
Several addresses will be sent to you, separated by spaces. Each one can be tested in your web browser to see if it functions.
Run the following command instead, and it should display your public IP address as seen from another place on the internet:
When you know your server’s IP address, type it into the address bar of your browser like follows:
The standard Ubuntu 18.04 Apache web page should appear for you:

This website shows that Apache is operating properly. Additionally, it contains certain fundamental details regarding the locations of key Apache files and directories.
Now that your web server is running, let’s go through some fundamental administrative commands.
The command shown below can be used to terminate your web server:
To start the web server when it is stopped, run this command:
By performing the following, you can halt the service and then restart it:
If all that needs to be changed is the configuration, Apache can frequently reload without losing connections. Execute the next command to do this:
When the server boots, Apache is set to launch automatically by default. If you’d rather not have this behaviour, you can stop it by doing the following:
Alternately, run the following command to enable or re-enable the service to start up at boot:
When the server restarts, Apache should now launch automatically.
When utilising the Apache web server, you can host several domains from a single server by using virtual hosts, which are akin to server blocks in Nginx. We’ll create a domain called your domain for our example; however, you should use your own domain name instead.
One server block is enabled by default in Apache on Ubuntu 18.04, and it is set up to serve files from the /var/www/html directory. While this is effective for a single site, hosting many sites might make it cumbersome. Create a directory structure within /var/www for a your domain site instead of making changes to /var/www/html. If a client request doesn’t match any other sites, /var/www/html will still be supplied as the default directory.
The directory for your domain should be created as follows:
Next, use the $USER environment variable to specify who owns the directory:
If you haven’t changed your unmask value, the permissions of your web roots should be correct, but you may double-check by typing the following:
Next, using nano or your preferred editor, make a sample index.html page as follows:
Add the following example HTML inside:
<html>
<head>
<title>Welcome to Your_domain!</title>
</head>
<body>
<h1>Success! The your_domain virtual host is working!</h1>
</body>
</html>
When you’re done, save and shut the file. If you used nano, press CTRL + X, Y, and ENTER to stop using it.
It is important to construct a virtual host file with the appropriate directives in order for Apache to deliver this content. Make a new configuration file at /etc/apache2/sites-available/your domain.conf rather than directly altering the default one at /etc/apache2/sites-available/000-default.conf:
The configuration block below should be added; it is similar to the default but changed with your new directory and domain name:
<VirtualHost *:80>
ServerAdmin webmaster@localhost
ServerName your_domain
ServerAlias www.your_domain
DocumentRoot /var/www/your_domain
ErrorLog ${APACHE_LOG_DIR}/error.log
CustomLog ${APACHE_LOG_DIR}/access.log combined
</VirtualHost>
You’ll see that we’ve changed ServerAdmin to an email that the your domain site administrator can access and DocumentRoot to point to our new directory. Additionally, we’ve introduced two directives: ServerName, which provides the base domain that must match for the definition of this virtual host, and ServerAlias, which specifies additional names that must match as if they were the base name.
When you’re done, save and shut the file.
Next, use the a2ensite tool to enable the file:
The default site specified in 000-default.conf should be disabled:
Check now for configuration issues:
You need to get the following result:
Syntax OK
To put your modifications into effect, restart Apache:
Your domain name should now be served by Apache. You can check this by going to http://your domain; you ought to see something similar to this:

After learning how to control the Apache service, you should spend some time getting acquainted with a few crucial directories and files.
- /var/www/html: The real web content is provided from the /var/www/html directory, which by default simply contains the Apache default page you saw before. By making changes to the Apache configuration files, this can be adjusted.
- /etc/apache2:
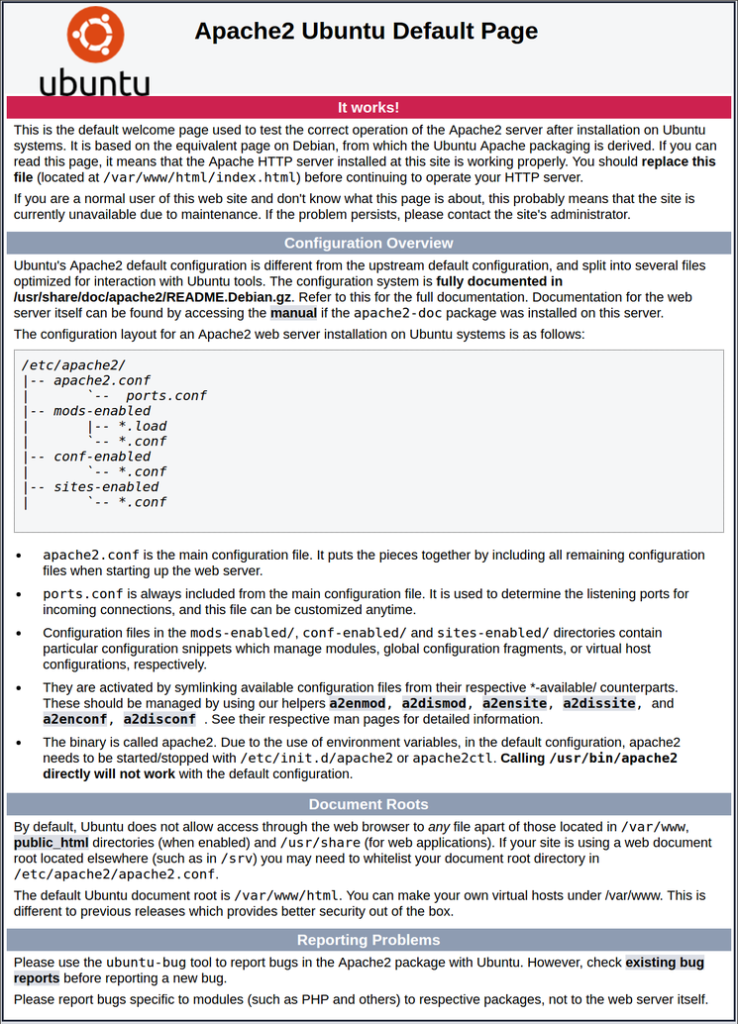
The Apache configuration directory. All of the Apache configuration files reside here.
- /etc/apache2/apache2.conf:
the main configuration file for Apache. To update the global configuration of Apache, modify this. Numerous other files in the configuration directory are loaded by this file.
- /etc/apache2/ports.conf:
The ports that Apache will listen on are listed in this file. When a module with SSL capabilities is activated, Apache also listens on port 443 in addition to port 80 by default.
- /etc/apache2/sites-available/:
the directory that can house virtual hosts specific to each site. The configuration files in this directory must be linked to the sites-enabled directory in order for Apache to use them. Typically, all server block configuration is completed in this directory, and the other directory is linked with the a2ensite command to enable it.
- /etc/apache2/sites-enabled/:
the directory that contains activated per-site virtual hosts. These are often made by using the a2ensite to connect to configuration files located in the sites-available directory. When Apache begins or reloads, it examines the configuration files and links located in this directory to create a complete configuration.
- /etc/apache2/conf-available/, /etc/apache2/conf-enabled/:
Directories are used to store configuration fragments that do not belong on a virtual host, but they share the same relationship as the sites-available and sites-enabled directories. Using the a2enconf and a2disconf commands, you can enable and disable files in the conf-available directory.
- /etc/apache2/mods-available/, /etc/apache2/mods-enabled/:
The available and enabled modules are correspondingly contained in these folders. Specific module loading fragments are found in files with the.load extension, and their configuration is found in files with the.conf extension. The a2enmod and a2dismod commands can be used to enable and disable modules, respectively.g
/var/log/apache2/access.log:
Unless Apache is configured differently, every request to your web server is automatically logged in this log file.
- /var/log/apache2/error.log:
By default, this file contains a record of every error.
How much information will be included in the error logs is determined by the LogLevel directive in the Apache configuration.
After installing Apache, you have a wide range of options for the content types you may serve and the technologies you can utilise to give users a richer experience.